<< den deutschen Post findet ihr weiter unten >>
_____
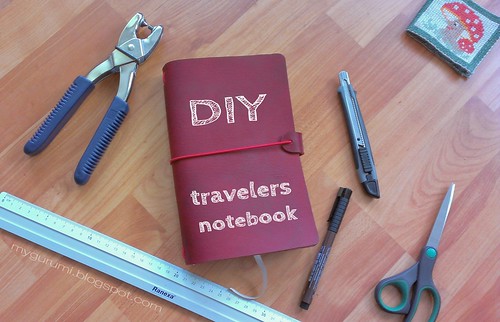
so let's make a travelers notebook today, shall we? I mentioned I made a midori style notebook the other day. I liked the midori the minute I first saw it, but didn't like I couldn't get the paper in a store. The original midori is a travelers notebook that's become quite popular lately and I wanted one to fit regular moleskine notebooks. So I made one.
here you will see how I did it and that you can make it as well. It's been very quick and satisfying to hold the finished piece within two hours.
What you'll need: leather, about 2-3 mm thick, it should be sturdy enough to fold around a notebook and give it support. An utility knife and I recommend a metal ruler, a pencil and some elastic band.
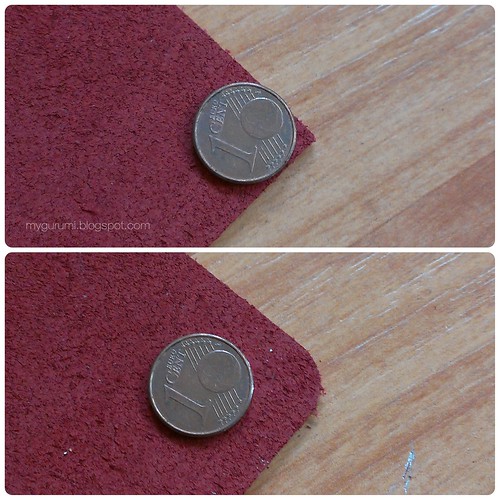
first: measure out the size you will need for your notebook. I sized mine 21,5 cm x 28,8 cm to cover moleskine cahiers. I gave a little extra on top/bottom and to the sides to allow the leather cover to hug around my notebooks. Once you measured draw the outline onto the wrong side of your piece of leather (I got mine from ebay in case you wondered) and with the help of your metal ruler and knife cut it out. It takes a few cuts to get through leather, but it workes surprisingly well.

now let's round the edges. If you don't care about rounded edges, just skip this step. I tried a few coins to see how much curve I wanted for the edges and went for a 1 cent piece in the end. To cut the edge I didn't cut in a long stroke like for the sides but pressed the utility knife down into the leather little bit by bit next to the coin. This made an interesting sound ^__^ and once I cut the edge of I cleaned it while still holding the coin firmly in place and now actually cutting along the coin with the knife, easy peasy
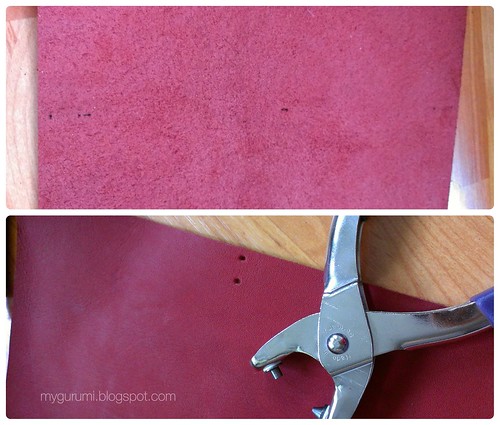
to punch the holes into the leather for the rubber band I used my handy hole puncher, you can use an awl of course as well. It's the original leather tool to make holes. Just pushing a needle with the elastic through the leather might cause the leather to tear with time.
I marked 5 holes total, all along the middle of the leather. Two on top and bottom each and one in the middle.
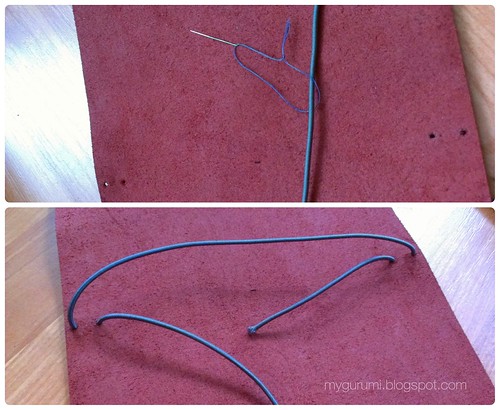
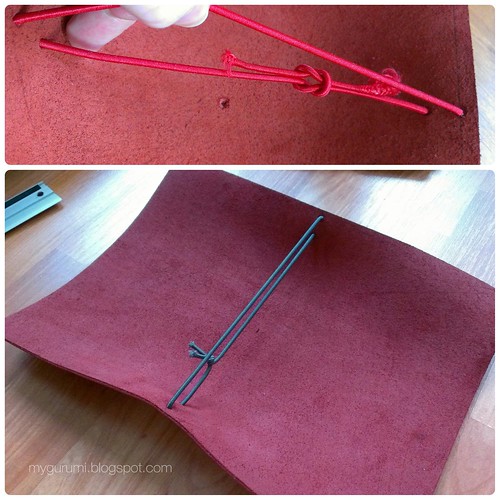
I used a normal sewing needle and some extra thread to make a "artificial extra big" eyelet, pulled the elastic through this super big eyelet and pulled the elastic through the top and bottom holes of the leather cover like pictured below:
For my first notebook I made a classic knot, you can see the grey elastic below. With my second notebook (it was just so much fun, I had to make a second one) I made a different knot. It's pictured in the red elastic and I let it open to take the picture. This type of knot is a lot flatter than the one I used for the gray elastic and therefore fits much better. (Both knots probably have fancy names but I don't know them, if you do, please name them below in the comments section, thank you)
What you can also see in the pic below is that the elastic should cause some tension on the leather cover, this will flatten once you put a notebook inside and will help pulling the notebook into cover.
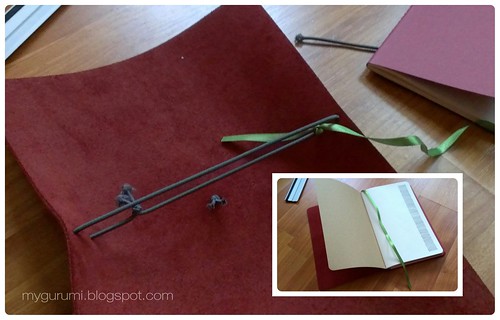
to finish it off I added a little piece of ribbon to the inner part of the elastic to work as a book mark and also made a loop out of a second piece of elastic which I pulled through the hole in the middle of the notebook cover. This will close your travelers notebook later. You can see the knot inside the notebook below and also how a moleskine looks once inserted.
(just open the notebook along the middle and pull it through the top elastic band, so the 'upper' part of the elastics will lay inside your notebook and the knotted part of the elastic lays between the notebook back and the leather, if you need more pictures on this step and also how to include more than one notebook, just leave me a comment)
that's it! I told you it was pretty simple ^__^
_____
Also lasst uns heute ein Reisenotizbuch machen, ja? oh je, Reisenotizbuch klingt ja auch toll, travelers notebook ist doch irgendwie cooler, naja ^__^
Ich bin über das Midori gestolpert vor ein paar Wochen und war gleich verliebt, simple und funktionell, sowas wollte ich auch. Was ich allerdings nicht so toll fand war, dass ich die Bücher für das Midori nicht überall im Laden bekomme. Die Originalbücher sind deutlich schmaler als unsere handelsüblichen Notizbücher. Also hab ich mir eins gemacht in dass ich einfach Moleskines legen kann, die gibt es ja inzwischen in praktisch jedem Buchladen.
Ein travelers notebook zu machen (entschuldigt, ich bleib hier bei englisch) geht ziemlich schnell und macht einen sehr zufrieden, so schnell Resultate zu sehen ist einfach schön
Was braucht ihr? ein Stück Leder, ungefähr 2-3mm dick, ein Teppichmesser und ich empfehle ein Metalllineal dazu, was zum aufzeichnen und Elastikschnur.
und wie funktioniert's nun?
zuerstmal hab ich mein Notizbuch ausgemessen und an allen Seiten ein klein wenig mehr Spielraum eingerechnet, so dass ich am Ende 21,5mm x 28,8mm auf die Rückseite des Leders aufgemalt hab. Das ganze dann mit dem cutter Messer ausschneiden. Man muss ein paar mal drüber gehen über das Leder, aber es schneidet sich erstaunlich gut.
Um die Ecken abzurunden hab ich einfach eine Münze genommen und das Messer jetzt Stück für Stück ins Leder gedrückt. Schneiden klappt hier nicht so richtig, dazu ist der Winkel einfach zu klein. Aber drücken klappt ganz gut, klingt auch toll und zum Schluss hab ich dann noch versäubert indem ich mit dem Messer dann doch entlang der Münze geschnitten hab, ganz leicht.
Dann markiert ihr die Löcher für das Gummiband. Je zwei oben und unten und eins in der Mitte. Alle entlang der Mittellinie des Lederstücks. Ausgestanzt hab ich die dann mit meinem Gürtellochstanzer (original nimmt man eine Ahle, die hab ich aber nicht da)
So, und nun nur noch das Gummiband durch die Löcher fummeln, dafür einfach eine Nadel nehmen, ein Stück Faden rein und verknoten als extragroße Öse und dann wie oben abgebildet durch die Löcher ziehen.
Verknoten. Nach meinem zweiten Versuch empfehle ich den Knoten in dem roten Gummiband nachzumachen, der liegt viel flacher im Notizbuch als der graue. (da gibt's bestimmt tolle Namen für die jeweiligen Knoten, die kenn ich aber nicht, falls ihr die kennt, dann lasst mir doch einen Kommentar da)
ja und dann seht ihr oben noch, dass das verknotete Band das Buch unter Spannung setzen sollte. Die gibt sich sobald man ein Buch reintut und hilft nachher auch das Buch an Ort und Stelle zu behalten.
Noch ein Stück Schleifenband als Lesezeichen oben dran und eine Schlaufe aus dem Gummiband durch das Mittelloch ziehen (ihr seht den Knoten in der Mitte auf dem letzten Bild) und fertig. Notizbuch mittig aufschlagen, durch die obere Gummibandschlaufe ziehen und tata!
Falls ihr doch noch Bilder braucht wie ihr die Bücher reinbekommt, und wie man mehr als ein Notizbuch ins travelers notebook kriegt, dann gebt mir einfach in den Kommentaren Bescheid.
_____
that's it for today, have a great weekend, Diana
In English, at least, the knot you used on the red elastic is called a "square knot" :) Thanks for the step-by-step!
AntwortenLöschenOh cool, thank you Melissa, learning something new every day :-)
LöschenHI Diana!
AntwortenLöschenSo you did it! yes, it looks pretty easy, may be cutting is the most difficult. I wonder what all beautiful sketches you are going to fill the notebook with? :) Have a nice week ahead!
I'm curious as well to see what will be in this books :-) have a great week as well
LöschenHow is your Moleskine Midori working out for you? I decided a Filofax wasn't the right fit for me, so now I'm trying a Midori :) Notebooks and journals are terribly addicting!
AntwortenLöschen